
Imagine hosting a dinner party and it’s time to show off that dessert. The one that makes everyone stop talking, with its amazing smells of cocoa and caramel. It’s a masterpiece you made yourself, layer by layer.
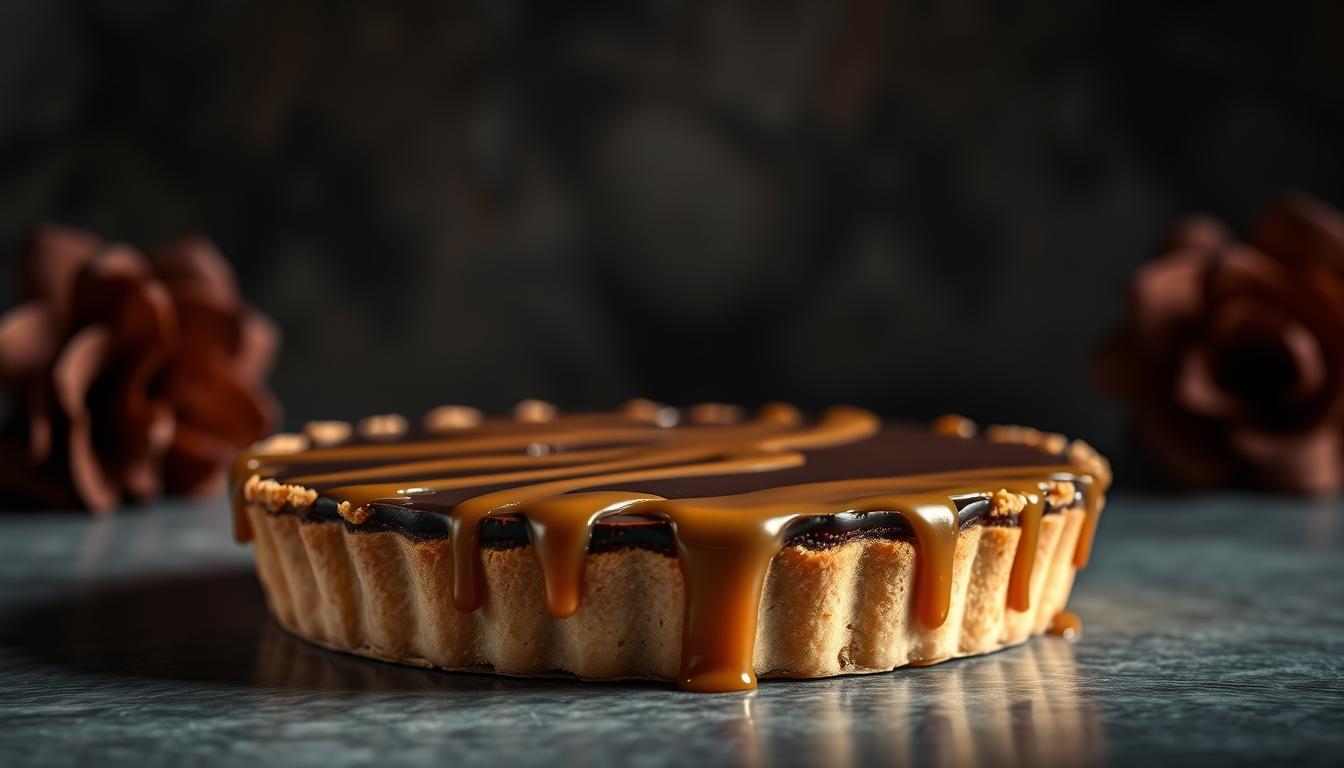
Making such a dessert might seem hard, but it’s actually easy. Just think of a chocolate crust, soft salted caramel, and smooth ganache on top. Each bite is a mix of sweet and salty that’s just right. You’ll think it’s from a fancy store until people start praising your cooking.
This treat has 630 calories per slice, making it perfect for big celebrations or special nights. But don’t worry, you don’t need to be a pro to make it. It just needs three layers, simple steps, and the fun of seeing it come to life in your kitchen.
Key Takeaways
- Features three irresistible layers: chocolate crust, salted caramel, and silky ganache
- Balances sweet and salty flavors for sophisticated taste
- Contains 630 calories per serving—perfect for special occasions
- Surprisingly achievable for home bakers of all skill levels
- Visually stunning presentation elevates any gathering
What is a Salted Caramel Chocolate Tart?
Imagine a dessert that perfectly balances sweet and salty flavors. It has layers of rich texture. The salted caramel chocolate tart does exactly that. It combines a buttery crust, gooey caramel center, and silky chocolate ganache. Let’s explore how this gourmet chocolate dessert became a modern classic.
Origins of the Tart
This decadent treat evolved from traditional French tarts. These tarts often had fruit or custard fillings. Pastry chefs in the early 2000s started using salted caramel, inspired by Brittany’s salted butter caramels. Adding dark chocolate made it luxurious, turning it into a staple at upscale bakeries.
“The magic lies in contrasting textures—crunchy crust against smooth caramel.”
Key Ingredients
Every delicious chocolate tart needs three essentials:
- Premium chocolate (70% cocoa or higher)
- Homemade salted caramel sauce
- A buttery, flaky crust
For the crust, bakers debate shortcrust vs. shortbread bases:
| Type | Texture | Best For |
|---|---|---|
| Shortcrust | Firm & crumbly | Structured tarts |
| Shortbread | Buttery & melt-in-mouth | Rich fillings |
Flavor Profile
Your first bite starts with a crisp crust. Then, the salty-sweet punch of caramel hits you. The dark chocolate ganache adds depth, balancing bitterness with creamy sweetness. It’s a rollercoaster of flavors—bold yet harmonious.
Pro tip: Sprinkle flaky sea salt on top before serving. This enhances the caramel’s richness and makes your gourmet chocolate dessert unforgettable.
The Perfect Tart Crust
The secret to a perfect tart is its crust. Whether you’re new to baking or experienced, knowing how to make a great crust is key. Let’s dive into the techniques for a crust that’s both crisp and buttery.

Types of Crusts
There are two main types of tart crusts: shortcrust and creamed butter. Shortcrust is popular in European recipes and is crumbly. For those looking for an easy option, creamed butter is the way to go. It’s simpler and doesn’t need a food processor. Here’s a comparison:
| Method | Texture | Best For |
|---|---|---|
| Shortcrust | Flaky & firm | Heavy fillings |
| Creamed Butter | Tender & crumbly | Quick recipes |
Roll the dough to 3mm thickness to avoid sogginess. This also helps support caramel or ganache layers. A pro tip is to use a ruler for accurate thickness.
Tips for a Flaky Crust
Cold ingredients are essential. Freeze butter cubes for 15 minutes before mixing, and chill the dough for 30+ minutes. This ensures flaky layers in your tart.
- Blind bake with rice or pie weights to prevent bubbles
- Prick the base with a fork before baking
- Rotate the pan halfway for even browning
“Overworking dough activates gluten – your enemy for tender crusts. Mix just until ingredients combine.”
For extra crispness, brush the pre-baked crust with egg white. This creates a moisture barrier, keeping your salted caramel chocolate tart crunchy for days.
Making the Salted Caramel Filling
Creating the caramel layer is where your tart goes from good to unforgettable. This step is a mix of science and art. Heat sugar just enough to caramelize it, then mix in butter and cream for that iconic sweet and salty dessert magic. Let’s break down the process so you can nail it on your first try.

Simple Salted Caramel Recipe
This 10-minute method uses precise ratios for smooth results every time:
- Combine 1 cup granulated sugar and ¼ cup water in a heavy saucepan.
- Cook on medium heat without stirring until amber-colored (350°F on a candy thermometer).
- Remove from heat and whisk in 6 tbsp butter, followed by ½ cup heavy cream.
- Stir in 1½ tsp flaky sea salt once cooled to 200°F.
| Tool | Why It Matters | Pro Tip |
|---|---|---|
| Silicone Spatula | Prevents sugar crystallization | Use for gentle edge scraping |
| Metal Spoon | Conducts heat quickly | Avoid during initial cooking |
| Candy Thermometer | Ensures perfect temperature | Calibrate before starting |
How to Avoid Common Mistakes
Caramel can be tricky, but these fixes keep things stress-free:
Crystallization Solution: If sugar grains form, immediately cover the pan with a lid for 1 minute. The steam dissolves crystals without restarting the process.
Temperature Control: Never exceed 350°F—burnt sugar tastes bitter. Use a timer and stay within 3 feet of the stove.
“The lid trick works like magic for rescuing crystallized caramel. It’s saved countless batches in my test kitchen.”
Remember to let the caramel cool slightly before pouring it into your tart shell. This prevents the crust from getting soggy and maintains that crisp contrast everyone loves in salted caramel treats.
Crafting the Chocolate Ganache
No decadent tart recipe is complete without a velvety chocolate ganache layer. This luxurious blend of chocolate and cream adds depth to your dessert. It balances the salted caramel’s sweetness. Let’s break down how to master this essential component.

Choosing the Right Chocolate
Quality matters – your ganache will only taste as good as your chocolate. For a gourmet chocolate dessert, choose 70% dark chocolate bars over chips. The higher cocoa content gives:
- Rich, complex flavors
- Smooth melting properties
- Stable texture when cooled
Chefs at the International Chocolate Institute say 70% cocoa is the perfect balance. Avoid compound chocolate for real cocoa butter ensures proper setting.
Ganache Consistency Tips
Control your ganache’s texture with these three factors:
| Cream Ratio | Consistency | Best For |
|---|---|---|
| 1:1 | Pourable | Glazing |
| 1:2 | Spreadable | Filling |
| 1:3 | Truffle-like | Shaping |
For microwave tempering:
- Chop chocolate into even pieces
- Heat cream to 185°F (85°C)
- Pour over chocolate, wait 2 minutes
- Stir slowly from center outward
If your ganache looks grainy, gently reheat it in 10-second intervals while stirring. Too thick? Add warm cream 1 tsp at a time until smooth.
Assembly of the Tart
The magic happens when layers of caramel and ganache come together. This step seems straightforward, but getting the right texture balance is key. Let’s explore how to create clean, Instagram-worthy layers without stress.

Layering Techniques
Many bakers wonder if to use equal parts caramel and ganache. Our tests show a 1:1 ratio works best for flavor harmony. Start by pouring cooled caramel into the pre-baked crust, smoothing it with an offset spatula. Chill for 15 minutes to create a stable base before adding ganache.
Follow this simple sequence for success:
- Spread caramel ¼-inch thick
- Refrigerate until surface firms slightly
- Pour ganache while it’s pourable but not hot
Cooling and Setting Time
Patience is key with easy dessert ideas like this tart. Caramel needs 2-3 hours to set properly at room temperature, while ganache firms in just 1 hour refrigerated. Rushing these steps causes “layer bleed” – where dark chocolate seeps into golden caramel.
Use this timeline for perfect results:
| Stage | Location | Duration |
|---|---|---|
| Caramel Set | Countertop | 2-3 hours |
| Ganache Firming | Fridge | 1 hour |
Pro tip: Mark your fridge door with sticky notes to track cooling phases. This prevents accidental early slicing that could ruin your beautiful layers!
Fun Flavor Variations
Make your salted caramel chocolate tart your own with these simple tweaks. Add some crunch or a caffeine boost to this gourmet chocolate dessert. These ideas let you customize it while keeping its rich taste.

Adding Nuts or Sea Salt
Crunch lovers will adore toasted pecans or hazelnuts. Sprinkle them over the caramel before adding ganache. The nuts stay crunchy and add a nutty flavor.
For a salty kick, try Maldon sea salt. A light sprinkle on top adds a burst of saltiness. For a fancy touch, mix coarse salt with candied pecans on top.
Infusing with Espresso
Coffee and chocolate are a perfect pair. Add 1 tsp instant espresso powder to the ganache for a mocha flavor. For a stronger taste, warm cream with coffee beans before making the caramel.
Serve with coffee ice cream or dark chocolate shavings. The tart’s bitterness balances its sweetness, making it feel fancy yet balanced.
Perfect Pairings
Your delicious chocolate tart needs the right friends to shine. We’ll look at drinks and treats that make this easy dessert idea a hit.

Ideal Beverage Choices
Match the tart’s sweetness with drinks that balance it out. A strong espresso pairs well with the tart’s caramel, while Moscato wine complements its sweetness.
“A shot of espresso acts like a flavor reset button between bites, letting you savor each layer anew.”
For those who don’t like caffeine, try these:
- Cold milk with a dash of vanilla
- Spiced chai tea (hot or iced)
- Sparkling water with lime
Best Accompaniments
Texture is key in pairing. Unsweetened whipped cream adds a light touch, while vanilla ice cream offers a cool contrast. Fresh raspberries add a tangy touch to the chocolate.
| Topping | Flavor Impact | Best For |
|---|---|---|
| Whipped Cream | Light & airy | Formal dinners |
| Vanilla Ice Cream | Creamy & indulgent | Casual gatherings |
| Toasted Pecans | Crunchy & earthy | Texture lovers |
Pro tip: Use berries in a circle around each slice for a great photo. Frozen berries are a good choice if fresh ones are hard to find!
Serving Suggestions
Your salted caramel chocolate tart is ready for a grand finale. How you serve it can make a big difference. Whether you’re hosting a dinner party or having a cozy night in, these tips will help. They ensure every bite looks as decadent as it tastes.

Presentation Ideas
Begin by warming your knife under hot water before slicing. This creates clean edges that highlight the tart’s layers. For a professional look, dust the plate with cocoa powder using a fine-mesh sieve.
Add flaky sea salt just before serving to keep its crunch and look. Pair each slice with fresh berries or edible flowers for color. A drizzle of extra caramel sauce beside the tart makes the plate a canvas. Remember, garnish right before serving to keep the salt from dissolving into the caramel.
Portion Sizes
Cut the tart into 12 slim wedges for balanced servings. This sweet and salty dessert is rich, so smaller portions are better. Use the “clock method”: slice vertically at 12, 3, 6, and 9 o’clock first, then divide each quarter into thirds.
For buffet-style events, pre-slice and arrange pieces on a marble slab or cake stand. Leave a small spatula nearby for guests to serve themselves. Store any leftovers immediately—the caramel layer softens at room temperature after two hours.
Storing Leftovers
Learn how to keep your salted caramel chocolate tart fresh for longer. The right storage keeps its flavor rich and texture perfect. Every bite will be as good as the first.

Refrigeration Tips
Put leftovers in an airtight container in the fridge for up to 4-5 days. The crust might get soft by day 3. But, baking it at 350°F for 10 minutes makes it crisp again.
For vegan caramel made with coconut milk, use parchment paper. It stops moisture from getting in.
Freezing Options
Freeze individual slices for long-term storage:
- Wrap each slice in wax paper to avoid freezer burn
- Place wrapped slices in a freezer-safe bag
- Label with the date – stays fresh for 1 month
Thaw overnight in the fridge before serving. Don’t microwave it. It messes up the caramel layers.
Why You’ll Love This Dessert
Why settle for ordinary when this showstopping tart guarantees smiles and empty plates? It combines velvety chocolate, gooey caramel, and a hint of salt. This chocolate caramel dessert is perfect for both casual gatherings and formal celebrations. Plus, you can make it up to two days ahead, making hosting stress-free.

Crowd-Pleasing Appeal
This tart’s magic lies in its universal charm. The sweet-salty contrast satisfies diverse palates, while the rich cocoa flavor feels indulgent. It’s also easily adaptable. You can swap the crust for a gluten-free version or add crushed pretzels for extra crunch.
Guests will rave about its “restaurant-quality taste”. And you’ll love how simple it is to assemble.
| Feature | Benefit |
|---|---|
| Make-ahead friendly | Reduces last-minute prep stress |
| Customizable toppings | Suits dietary preferences |
| Balanced flavors | Appeals to adults and kids |
Occasions to Serve
This versatile tart shines at any event. Serve it chilled during summer barbecues or slightly warmed for cozy holiday dinners. Here’s when it truly steals the spotlight:
| Event | Why It Works |
|---|---|
| Dinner Parties | Elegant presentation impresses guests |
| Birthdays | Feels special without requiring cake decorating |
| Potlucks | Holds up well during transport |
Whether you’re hosting 5 or 15 people, this easy dessert idea delivers maximum flavor with minimal effort. Pair it with coffee for brunch or vanilla ice cream for date night—it’s always the right choice.
Frequently Asked Questions
When you start making this sweet and salty dessert, you might have questions. Here are answers to common ones to help you make your gourmet chocolate tart with ease.
Can I Make This Ahead of Time?
Yes, you can! Make the tart up to 3 days before you plan to serve it. Just keep it covered in the fridge. For vegan options, use coconut milk instead of heavy cream. It adds a nice tropical flavor without losing the richness.
Is It Gluten-Free?
The caramel and chocolate layers don’t have gluten. For the crust, use a 1:1 gluten-free flour blend. Make sure to press the dough firmly into the pan. This helps your gluten-free tart look as good as the traditional ones.
This dessert is perfect for dinner parties or when you just want something special. Share your tart on social media and use #ChocolateTartMagic. It’s a great way to inspire other bakers!
FAQ
Can I make this salted caramel chocolate tart ahead of time?
Is this dessert gluten-free?
What’s the difference between shortcrust and shortbread bases?
How do I prevent grainy or seized caramel?
Can I adjust the ganache consistency?
What’s the best beverage pairing for this rich tart?
How do I achieve clean slices without layer smudging?
Can I freeze leftovers?
Why use cocoa powder AND chocolate in the crust?
How many servings does this 630-calorie tart yield?
Salted Caramel Chocolate Tart
Ingredients
- For the Chocolate Crust:
- 1 ½ cups all-purpose flour or gluten-free 1:1 flour blend
- ¼ cup unsweetened cocoa powder Dutch-processed preferred
- ½ cup powdered sugar
- ¼ tsp salt
- ½ cup cold unsalted butter cubed
- 1 large egg yolk
- 2 tbsp ice water as needed
- For the Salted Caramel:
- 1 cup granulated sugar
- ¼ cup water
- 6 tbsp unsalted butter room temperature
- ½ cup heavy cream warm
- 1 ½ tsp flaky sea salt plus more for garnish
- For the Chocolate Ganache:
- 8 oz high-quality dark chocolate 70% cocoa, chopped
- 1 cup heavy cream
- 1 tbsp unsalted butter optional, for shine
Instructions
- For the Chocolate Crust:
- In a food processor, pulse together flour, cocoa powder, powdered sugar, and salt until combined.
- Add cold cubed butter and pulse until mixture resembles coarse crumbs.
- Add egg yolk and pulse. If needed, add ice water one tablespoon at a time until dough just comes together.
- Form dough into a disk, wrap in plastic, and refrigerate for at least 1 hour.
- Preheat oven to 350°F (175°C).
- Roll chilled dough to 3mm thickness and press into a 9-inch tart pan with removable bottom.
- Prick the bottom with a fork, line with parchment paper, and fill with pie weights or dried beans.
- Blind bake for 15 minutes, then remove weights and parchment and bake for another 5-7 minutes until fully cooked.
- Allow crust to cool completely before filling.
- For the Salted Caramel:
- In a heavy saucepan, combine sugar and water. Heat over medium heat without stirring.
- Once sugar begins to color, swirl the pan gently until it reaches an amber color (about 350°F on a candy thermometer).
- Remove from heat and carefully whisk in butter until melted and combined.
- Slowly add warm heavy cream, whisking constantly (mixture will bubble vigorously).
- Return to low heat and cook for 1 minute, stirring constantly.
- Remove from heat and stir in sea salt. Allow to cool slightly to 200°F.
- Pour caramel into cooled tart shell, creating an even layer. Refrigerate for 2-3 hours until set.
- For the Chocolate Ganache:
- Place chopped chocolate in a heatproof bowl.
- Heat heavy cream in a saucepan until it just begins to simmer (do not boil).
- Pour hot cream over chocolate and let stand for 2 minutes.
- Gently stir from the center outward until smooth and glossy.
- If using, add butter and stir until melted and incorporated.
- Allow ganache to cool slightly until just pourable but not hot.
- Pour ganache over the set caramel layer, spreading to the edges.
- Refrigerate for at least 1 hour until ganache is set.
- Before serving, sprinkle with additional flaky sea salt.